


step 1
Create a new document. I chose 1000 x 707 px for this design. First download Autumn Road 6 and bring it into your newly created document. Re-size and position it.

On this photo, the sky is ok, however I prefer Apocalyptic Sky. So let's change it. First we want to mask out the sky. Choose the Autumn Road layer, click layer mask and start painting out the unwanted parts with black. The key to successful masking is to first use a large brush with 100% hardness to erase large areas, then use a smaller brush with zero hardness to erase the detailed parts. Here is the final result after masking.

Step 2
Step 3
We are ready to add our new sky. Download Apocalyptic Sky, bring it out to Photoshop in a new layer placed under our road photo layer. Re-size and position our new sky.

Step 4
I prefer to adjust the colors and lighting after laying out the composition. Download Cityscape Stock, bring it to our composition and place it between the road layer and sky layer. As usual re-size and position it. Finally mask out the unwanted parts using a layer mask.

Step 5
Next we have our wrecked car. Download Marysville Ghost Town 2, and bring it into our Photoshop file. Place it on top of the layer stack, position and re-size it as usual. Finally, mask out unwanted parts.

Step 6
Now we are going to bring in the bunker. Download Coquina Fort and import it into our Photoshop composition on top of the layer stack. Re-size and position the bunker, then mask out the unwanted parts.
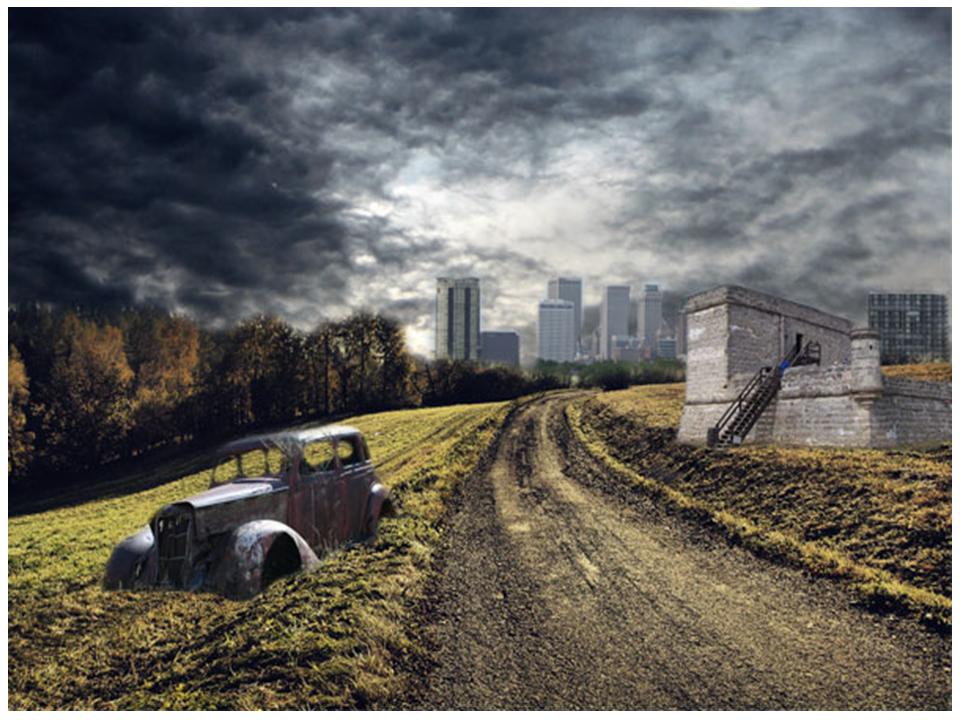
Our composition elements are now in place, and your image should look like this:
Step 7
First of all congratulations! There will be no masking (I know sometimes it gets really boring) after step 6. We will start adjusting the colors, lighting, shadows etc. to give our image a dark and grungy look. First add a levels adjustment layer to road layer with the following settings, making sure to clip it to the road layer):

Step 8
Now let's add a curves adjustment layer to our road, and again clip it to the road layer. Here are the settings:

Step 9
Now it's time to play with the sky. First let's change the color balance. Add a color balance adjustment layer to sky and apply these settings.
And here is the final result after adjustment:

Step 10
Next let's differentiate the color balance. Select the layer mask of the Color Balance adjustment layer. Choose Filter - Render - Difference Clouds. This will ease the effect of color balance adjustment layer. Here is what I get after applying filter:

Step 11
Our last step for the sky is to apply a curves adjustment layer and clip it to the sky layer. Here are the settings:

Step 12
Now it's time to make adjustments to the Cityscape layer. First of all it's too bright. To change it, apply levels adjustment layer to this layer with the following settings (clip this to the Cityscape layer):

Step 13
Now apply a curves adjustment layer to the Cityscape with the following settings (clip this to the Cityscape layer):

Step 14
Now we will make some adjustments to the bunker. Start with adding a curves adjustment layer (clip to bunker layer). Here are the settings:

Step 15
Now apply a levels adjustment layer (clip to bunker layer) with the following settings:

Step 16
Now it's time to play with our rusty car. It's way too bright for our composition. Therefore we will start by adding a brightness/contrast adjustment layer to it (clip this to the car layer). Here are the settings:

Step 17
Next apply a levels adjustment layer and clip it to our beloved car layer:

Step 18
Lastly add a curves adjustment layer and clip it to our car layer, here are the settings;

Conclusion


Read more: http://www.webdesign.org

2 komentar:
wagh,,,keren nih gan,,,mantap nih infonya,,,thank's ya gan
sip... sm2 gan, share ya new info nya !!
Posting Komentar