


Step 1
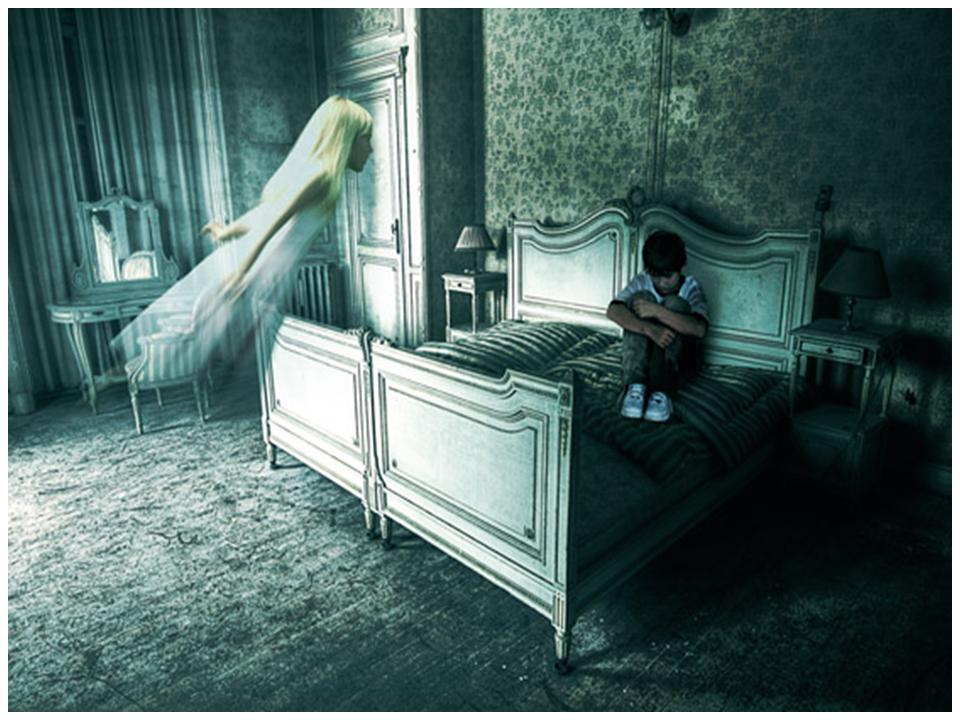
The starting point of this tutorial is the photo of an abandoned castel room. This photo is spectral even without any kind of photo-manipulation. Sometimes inspiration derives from a place, like in this case. Each place has something to say, a story behind. Let’s imagine how many things could have happened into a castle bedroom…
Open the photo in Photoshop.

Step 2
To darken the room, duplicate the layer (ctrl+J) and set the duplicated layer blend mode to Color Burn with opacity 30%.

Step 3
Now I don’t like this “warm” atmosphere. So go to Layer>New Adjustment Layer>Black & White to play a bit with colors. Move the cursors to modify the room colors.

Step 4
To make the details of the room more evident, press shift+alt+ctrl+E to merge all the layers into a new layer. Then apply the high pass filter (Filter>Other>High pass).

Then set the layer blending mode to Overlay. Below you can see the difference between the room before and after the effect.

Step 5
You can notice there is a light coming from the left, there should be a window in front of the bed. I want this light stronger, as if the entire left wall disappeared. To do so, we will use a filter that allows you to manage and create light effects. As we made in step 4, merge all the layers into a new layer. Then go to Filter>Render>Lighting Effects. Here you need to set up the style to “omni blu” and then move the light to the left, in correspondence with the mirror.

Now press shift+ctrl+U to desaturate the layer and set its blending mode to screen. The light effects looks perfect now.

Step 6
It’s time to introduce the first character of the scene, a melancholy child. After downloaded the image, extract the boy with the pen tool and merge him into the Photoshop document. Then press ctrl+T to re-size the kid, and put him on the bed.

Step 7
Since light comes from the left of the scene, we have to create the shadow effect of the boy on his left. Create a layer and move it below the kid’s layer. Grab a large soft (hardness 0%) black brush and paint to create the shadow. Reduce a bit the layer opacity and create other layers with other shadow effect. If you use several layers with different opacities the final result will look more realistic.

Step 8
To darken more the boy and to make his color contrasts stronger, grab the Burn tool in Shadows mode. Reduce exposure to around 50% and paint over the boy, in particular on his left (shadow area).

Step 9
The kid is too mush saturated. So press ctrl+U and reduce saturation to -35.

Step 10
To create the ghostly presence, I’ve used another beautiful shot of a child, realized by Angi Nelson. Extract the child with the pen tool and paste her into the document.

Go to Edit>Transform>Flip Horizontal. Then re-size and rotate the child (ctrl+T) so she will look oriented in the direction of the boy.

Add a layer mask and use a large soft black brush to gently eliminate the bottom of the child.

Step 11
To transmit the idea of a ghostly presence, duplicate the lady’s layer by pressing ctrl+J. Then go to Filter>Blur>Motion Blur and enter a distance around 80 pixels.

Then, using the mask, eliminate the head from the duplicate layer. In this way the head of the original layer will appear without the blur effect.

Step 12
As we made with the boy, reduce the saturation (ctrl+U).

Step 13
Create a new layer an set its blending mode to overlay. Then grab a soft white brush and paint over the child to create a light effect. Reduce the opacity of the layer if necessary.

Step 14
Select all the layers of the flying spectral presence and group them (ctrl+G). Then add a layer mask to the group and eliminate another part of the child. Then reduce the opacity of the group to 80%. Here is how my ghostly child looks at this stage:

Step 15
To increase the dark effect on the right, I created a new group of layers where I’ve painted on using black soft brushes.

Step 16
It’s time for the last adjustment layers. Let’s start with the Vibrance layer (Layer>New Adjustment layer>Vibrance) to lower down saturation to -30.

Then use the Color Balance layer (Layers>New Adjustment Layers>Color balance) to modify the colors of the entire scene. I played with the options to turn the atmosphere from “normal” to “spectral”, with a blue cold room as result.

And here is the result:

Step 17
The last touch: merge all the layers into a new layer (shift+alt+ctrl+E), then switch the layer blending mode to Color Burn with opacity 30%.
Finito! For every problem or suggestion, you can use the comments;-)

1 komentar:
Thank y ... I hope we can share design knowledge,
IT Essential Indonesia
Posting Komentar